


Complete Setup Steps for Linux Boxes (Please refer to previous post)
XAMPP= (X-Cross Platform, A-Apache, M-Mysql, P-PHP and P-Perl)
Here is step by step guide to install XAMPP in Windows environment from Scratch.
1. Downlaod latest version of XAMPP from here.
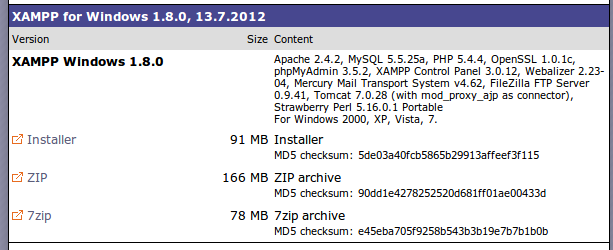
2. I am using Installer
version(.exe file) of XAMPP to install it to windows.It will be easy
for Newbies to install with installer version of XAMPP.Once downloaded
click on installer.you get following screen. select the language and
click on OK.
3. you will get following screen click on Next


4. After that you will
get following screen. the default is C://XAMPP. you can change it.may be
you can install it to USB drive then Browse USB drive to install it.

5. Click on Next then you will get following screen. This screen is for install options for window XP or before versions of Windows.
If you are using XP then select all of SERVICE SELECTION option on screen then click Install.

6. After clicking i install you get following screens.


7. When you click finish you will get following screen.Click on yes to start XAMPP control panel.

8. Next you will get following XAMPP control panel screen. here you can see that Apache and FileZilla is Runnng.If it is not running
for you then select their respective Svc and click Start .
The modules of Apache and Mysql is needed to develop and run PHP and
Mysql based applications.Start Apache , Mysql to start working with
XAMPP. No need for fileZill , Mercury and Tomcat right now.
9. On clicking at Svn and Start of Apache and Mysql you will get
following screen. if it is so then You have completed installation of XAMPP almost.
following screen. if it is so then You have completed installation of XAMPP almost.


10. Now you have to do basic configuration to start working with XAMPP. Open Web browser,in my case it is Firefox.type http://localhost/xampp you will get following page.

11. In left menus you can see Security menu item below Status menu item. Click on Security. you will get this screen.

12. Then click on the highlighed link http://localhost/security/xamppsecurity.php.you will get following screen. Setup password for ROOT the admin user of Mysql database. Enter passwords twice and click on Password Changing.
No need of enter passowrd for XAMPP
Directory protection if you are installing XAMPP at your computer for
developing purposes or testing purposes.

13.
Now it is time to test the current installation is working or not.
To test apache go to C:\xampp\htdocs create a folder name test and craete a
PHP file named
To test apache go to C:\xampp\htdocs create a folder name test and craete a
PHP file named
index.php
write following small test code in that
<?php phpinfo() ?>
and open followind url :
http://localhost/test
you will see following screen

Congratulations:
You have successfully installed XAMPP on your system!
For tightening the security and small tit-bit:
you can make database in xampp 1.7 in following way:
1. go to http://localhost/phpmyadmin/ and enter your mysql username(root) and password you set in previous steps. Once logged in you have a field titled “Create new database ” enter database name you want to create and click on “create” button. Database will be created.
2. In step 11 if security menu shows “These XAMPP pages are accessible by network for everyone” and the status is UNSECURE". For fixing it you need to secure “XAMPP DIRECTORY”. For this set username , Password for it. you can set it under the title “XAMPP DIRECTORY PROTECTION (.htaccess)” at ” http://localhost/security/xamppsecurity.php” page.

thanks for this full setup post of xampp.....
ReplyDeleteFULL VERSION SOFTWARE | PATCH
Thanks a lot for sharing such an informative article.
ReplyDeleteSEO Company Amravati
replica designer bags replica bags china high quality designer replica
ReplyDeletecheck this site out louis vuitton replica click here for more info Ysl replica bags read this gucci replica bags
ReplyDeletehttps://bayanlarsitesi.com/
ReplyDeleteEmek
Sultanahmet
Burgazada
Fenerbahçe
U01F63
ankara parça eşya taşıma
ReplyDeletetakipçi satın al
antalya rent a car
antalya rent a car
ankara parça eşya taşıma
4BKBVJ
kayseri evden eve nakliyat
ReplyDeleteantalya evden eve nakliyat
izmir evden eve nakliyat
nevşehir evden eve nakliyat
kayseri evden eve nakliyat
MQ4O8
maraş evden eve nakliyat
ReplyDeletemaraş evden eve nakliyat
izmir evden eve nakliyat
konya evden eve nakliyat
erzurum evden eve nakliyat
2BRS
EB13E
ReplyDeleteÇerkezköy Buzdolabı Tamircisi
Bingöl Lojistik
Bursa Evden Eve Nakliyat
Çerkezköy Parke Ustası
Mersin Şehir İçi Nakliyat
Samsun Parça Eşya Taşıma
Çorum Evden Eve Nakliyat
Bone Coin Hangi Borsada
Osmaniye Şehir İçi Nakliyat
40625
ReplyDeleteÇerkezköy Motor Ustası
Kayseri Şehir İçi Nakliyat
Ordu Şehirler Arası Nakliyat
Edirne Evden Eve Nakliyat
NWC Coin Hangi Borsada
Ankara Parke Ustası
Silivri Duşa Kabin Tamiri
Lunc Coin Hangi Borsada
Bitrue Güvenilir mi
17FD9
ReplyDeleteÇerkezköy Cam Balkon
Pursaklar Fayans Ustası
Ünye Petek Temizleme
Denizli Lojistik
Ünye Asma Tavan
Sui Coin Hangi Borsada
Çerkezköy Çatı Ustası
Kastamonu Şehir İçi Nakliyat
Aydın Evden Eve Nakliyat
23FC3
ReplyDeletesinop ücretsiz sohbet uygulaması
Ardahan Ücretsiz Görüntülü Sohbet
sohbet muhabbet
yalova canli goruntulu sohbet siteleri
canlı sohbet sitesi
kastamonu en iyi rastgele görüntülü sohbet
Bursa Ücretsiz Sohbet Sitesi
sesli sohbet sesli chat
görüntülü sohbet kadınlarla
2BB2E
ReplyDeleteTelegram Abone Satın Al
Binance Referans Kodu
Threads Beğeni Satın Al
Coin Çıkarma
Youtube İzlenme Hilesi
Tumblr Takipçi Hilesi
Mexc Borsası Kimin
Tiktok Beğeni Satın Al
Bitcoin Üretme
شركة تنظيف افران npFPKi6KFN
ReplyDeleteشركة مكافحة الحمام بالاحساء 8jVKdyYzik
ReplyDelete